
Uncategorized
Garage Door Sensor Not Working
Oct
Garage Door Sensor Not Working: 9 Essential Fixes for Common Problems
When a garage door sensor not working problem prevents an automatic garage door from closing normally, the cause may be something simple such as dirt, an obstruction, or a sensor that has shifted out of position. However, sensor problems can also involve wiring, power, physical damage, or another part of the opener system.
Understanding why a garage door sensor not working condition occurs can help you separate a basic maintenance issue from a problem that requires further diagnosis. The two safety sensors work together, so both sides of the system should be inspected rather than assuming that one particular sensor is automatically defective.
This guide explains nine common areas to check, how to approach sensor troubleshooting safely, what the indicator lights may tell you, when cleaning can help, and when a replacement component or professional inspection may be appropriate.
Important: Garage door sensor designs and diagnostic indicators vary by manufacturer and model. Always use the instructions for your exact opener when performing model-specific adjustments or tests.
Table of Contents
- How Garage Door Safety Sensors Work
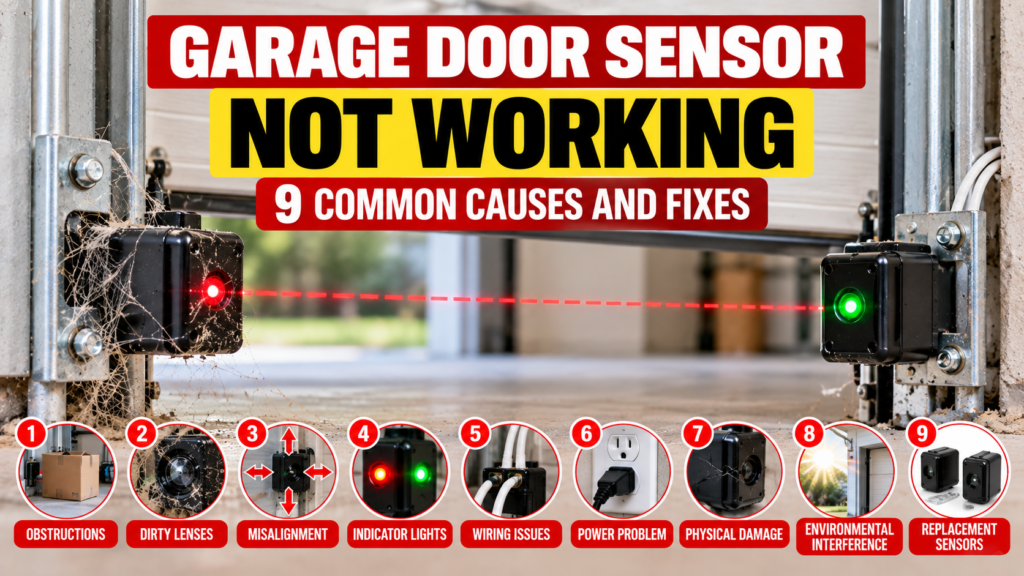
- 9 Common Causes of a Garage Door Sensor Not Working
- 1. Check for Obstructions
- 2. Clean the Sensor Lenses
- 3. Check Sensor Alignment
- 4. Check the Sensor Indicator Lights
- 5. Inspect Accessible Sensor Wiring
- 6. Check Opener Power
- 7. Look for Physical Damage
- 8. Consider Environmental Interference
- 9. Consider Replacement Sensors
- Sensor Symptoms and Possible Causes
- Garage Door Openers and Opener Parts
- How to Prevent Sensor Problems
- Garage Door Sensor Safety
- Related Articles
- Frequently Asked Questions
- Conclusion
How Garage Door Safety Sensors Work
Most automatic residential garage door systems use safety sensors positioned near the lower portion of the door tracks. The sensors work together to monitor the opening and provide an important part of the opener’s entrapment-protection system.
One sensor sends a signal toward the other sensor, while the receiving sensor detects that signal. The exact sensor technology and diagnostic behavior depend on the opener manufacturer and model.
If the system detects an obstruction, loses the expected signal, or detects another sensor-related condition, the opener may prevent normal closing or reverse the door.
This is why a garage door sensor not working problem should not simply be treated as an inconvenience. The safety system should remain functional and should never be bypassed just to make the door close.
9 Common Causes of a Garage Door Sensor Not Working
There are several possible reasons a garage door sensor may appear to stop working. The most useful approach is to begin with simple visual checks before assuming that a component has failed.
- An object is blocking the sensor path.
- The sensor lenses are dirty.
- The sensors are misaligned.
- The indicator lights show an abnormal condition.
- Sensor wiring is damaged or disconnected.
- The garage door opener has a power problem.
- A sensor or bracket is physically damaged.
- Environmental conditions interfere with sensor operation.
- A sensor component may require replacement.
These possibilities overlap, so the symptoms should be considered together rather than using one symptom as proof of a specific failure.
1. Check for Obstructions
The first thing to check when dealing with a garage door sensor not working condition is the area between the two sensors.
Look for objects that could interrupt the sensor path. Storage containers, tools, boxes, sports equipment, toys, or other objects near the bottom of the garage door opening can potentially interfere with the sensor system.
Also look for cobwebs, loose debris, or objects that may have fallen directly in front of either sensor.
Remove obvious obstructions without moving the sensor brackets. After clearing the area, observe the sensor indicators and follow the testing procedure specified by the opener manufacturer.
2. Clean the Sensor Lenses
Dust and debris can accumulate on sensors because they are mounted relatively close to the floor. If the lens area is visibly dirty, careful cleaning is a reasonable maintenance step.
Use a clean, soft cloth and gently remove surface dirt. Avoid abrasive materials that could scratch the lens.
Do not spray an unknown chemical directly onto an electrical sensor. If the manufacturer provides specific cleaning instructions, those instructions should take priority.
For a detailed cleaning procedure, see our guide to Garage Door Sensor Cleaning.
If cleaning does not resolve the garage door sensor not working condition, continue with the remaining checks instead of repeatedly cleaning the same component.
3. Check Sensor Alignment
Sensor alignment is another common area to investigate. The two sensors need to maintain the correct relationship so that the receiving sensor can detect the expected signal.
A sensor bracket can be moved accidentally by contact with stored items, tools, equipment, or other objects. Vibration may also affect a loose mounting arrangement.
Look at both sensors from the front and check whether they appear to be positioned consistently. Do not assume that a generic adjustment method applies to every garage door opener.
When model-specific alignment is required, use the instructions supplied by the opener manufacturer.
Remember: Clean sensors can still be misaligned. Cleaning and alignment are separate troubleshooting steps.
4. Check the Sensor Indicator Lights
Many garage door safety sensors have indicator lights that provide useful diagnostic information. However, the meaning of each light and flash pattern varies by manufacturer and model.
When a garage door sensor not working problem occurs, record what each sensor’s indicator is doing before making adjustments.
Depending on the system, an indicator may be:
- Steady.
- Off.
- Flashing.
- Dim or inconsistent.
Do not assume that both sensors must display identical colors. Some systems use different indicators for the sending and receiving sensors.
For example, certain LiftMaster systems use different indicator behavior to show the status of the sending and receiving sensors. The exact diagnostic information should be confirmed against the manual for the specific opener.
If the lights indicate an obstruction, wiring problem, or alignment condition, follow the appropriate manufacturer procedure before replacing components.
5. Inspect Accessible Sensor Wiring
Wiring should be considered when a garage door sensor not working condition continues after cleaning and checking the sensor path.
Look for obvious signs such as a visibly disconnected wire, damaged insulation, or wiring that has been pinched or disturbed.
Do not pull on wires or dismantle electrical connections simply to see whether they are secure. If electrical work is outside your experience, have the system inspected by a qualified professional.
For systems where the manufacturer provides specific wiring diagnostics, use those instructions rather than relying on a generic wiring procedure.
A sensor that has no indicator light may have a power or wiring issue, but that symptom alone does not establish exactly where the fault is located.
6. Check Opener Power
A sensor cannot operate normally if the garage door opener itself does not have the required power.
If both sensor indicators are off, first consider whether the opener has power and whether the opener’s other functions are operating normally.
Check the obvious power conditions without opening electrical components or performing unsafe electrical tests.
If the opener has a larger electrical problem, professional service may be appropriate.
Do not replace safety sensors simply because their lights are off until the basic power and wiring conditions have been considered.
7. Look for Physical Damage
Inspect the sensor housings and mounting brackets for obvious physical damage.
A sensor may have been struck by a vehicle, bicycle, storage item, tool, or another object. A damaged bracket can also allow the sensor to move from its intended position.
Look for:
- Cracked sensor housings.
- Broken or bent brackets.
- Loose mounting hardware.
- Visible cable damage.
- Signs of impact.
- Moisture or contamination.
If physical damage is present, cleaning alone is unlikely to solve the problem.
8. Consider Environmental Interference
Environmental conditions can sometimes affect sensor operation. Direct sunlight, heavy contamination, moisture, or changes around the sensor area may create conditions that interfere with the expected signal.
If a garage door sensor not working condition appears only at certain times of day or under particular environmental conditions, document the pattern.
Do not immediately replace the sensor based only on a time-of-day symptom. Compare the behavior with the manufacturer’s troubleshooting information for the exact opener.
This approach can help distinguish a persistent hardware problem from an environmental condition.
9. Consider Replacement Sensors
If cleaning, inspection, alignment checks, and appropriate troubleshooting do not resolve a garage door sensor not working problem, a replacement component may eventually need to be considered.
However, replacing a sensor should not be the first response to every sensor-related symptom.
Before ordering a replacement, identify:
- The opener manufacturer.
- The exact opener model.
- The existing sensor information.
- The part number when available.
- The manufacturer’s compatibility information.
Two sensors can look similar while having different compatibility requirements. Never assume that a sensor is compatible simply because its housing looks the same as the original component.
Compatibility reminder: Verify the exact opener model and applicable part information before ordering a replacement sensor.
Sensor Symptoms and Possible Causes
| Observed Symptom | Possible Area to Check | Next Step |
|---|---|---|
| Sensor lens visibly dirty | Surface contamination | Clean both lenses carefully and retest according to the manufacturer’s instructions. |
| Something blocks the sensor path | Obstruction | Clear the obstruction and check the sensor indicators. |
| Sensor appears moved | Alignment or mounting | Follow the exact opener’s alignment procedure. |
| One indicator is off | Power, wiring, or sensor condition | Check the manufacturer’s diagnostic information before replacing parts. |
| Visible wiring damage | Wiring | Stop unsafe troubleshooting and arrange appropriate repair if necessary. |
| Physical sensor damage | Hardware | Identify the correct replacement component and verify compatibility. |
| Problem occurs under specific environmental conditions | Interference or environment | Document the pattern and compare it with manufacturer guidance. |
Garage Door Openers and Opener Parts
If troubleshooting reveals that the existing operator or a component may need replacement, start with the correct product category rather than choosing a part based only on appearance.
Garage Door Openers
Browse Garage Door Openers to explore available opener products.
Before ordering an opener, compare the product information with your door type, application, installation requirements, and existing system. Verify compatibility before purchasing.
Garage Door Opener Parts
For replacement components, browse Garage Door Opener Parts.
The available parts category can be useful when a troubleshooting process points toward a replaceable operator component. Always verify the exact model and part compatibility before ordering.
How to Prevent Sensor Problems
Routine observation can help reduce avoidable sensor problems. The goal is not to constantly adjust the sensors but to notice changes before they become larger problems.
Keep the Sensor Area Clear
Avoid storing objects where they can interfere with the sensor path or strike the sensor brackets.
Inspect for Cobwebs and Dirt
Because sensors are installed near the lower portion of the garage door opening, periodically look for accumulated dust, dirt, and cobwebs.
Watch for Changes in Behavior
If the garage door begins behaving differently, investigate the symptoms instead of repeatedly operating the door without identifying the cause.
Protect the Sensor Wiring
Avoid placing equipment or storage items against exposed sensor wiring. Visible damage should be addressed appropriately rather than hidden or taped over without determining the underlying issue.
Keep the Safety System Functional
Never treat the sensors as an optional feature. They form part of the opener’s safety system and should remain operational.
Garage Door Sensor Safety
Safety first: Automatic garage door systems contain moving equipment and can present serious hazards if safety systems are bypassed or incorrectly adjusted.
- Never bypass or permanently disable the safety sensors.
- Do not place objects in the sensor path to defeat the safety system.
- Keep children and other people away from the door during testing.
- Do not attempt electrical repairs unless you are qualified to perform them safely.
- Do not attempt spring, cable, or structural garage-door repairs as part of sensor troubleshooting.
- Follow the manufacturer’s instructions for the exact opener model.
The U.S. Consumer Product Safety Commission identifies automatic residential garage door operators as products subject to mandatory safety requirements under 16 CFR Part 1211. Its guidance also addresses entrapment protection requirements for automatic residential garage door operators.
For that reason, a sensor problem should be treated as a safety-system issue rather than something to bypass simply to restore normal closing.
For official safety information, see the Consumer Product Safety Commission guidance on automatic residential garage door operators.
You can also review the CPSC garage door operator and gate operator safety information.
Related Articles
Frequently Asked Questions
1. Why is my garage door sensor not working?
A sensor problem can have several causes, including dirt, an obstruction, misalignment, wiring problems, power issues, physical damage, environmental interference, or a failed component. Start with simple visual checks before replacing parts.
2. Can dirty sensors prevent my garage door from closing?
Yes, contamination can interfere with sensor operation. If the lenses are visibly dirty, carefully clean them with a soft cloth and then follow the manufacturer’s testing procedure.
3. How do I know if my garage door sensors are aligned?
The exact indicator behavior depends on the opener model. Check the sensor indicators and compare their condition with the manufacturer’s instructions rather than assuming every opener uses the same light pattern.
4. Why is one garage door sensor light off?
An indicator that is off can have several possible causes, including power, wiring, sensor condition, or another system issue. Check the opener’s model-specific diagnostic information before replacing the sensor.
5. Should both garage door sensor lights be the same color?
Not necessarily. Different garage door opener systems can use different indicator colors and behaviors for sending and receiving sensors. Always check the documentation for the exact model.
6. Can I replace only one garage door sensor?
Whether one sensor can be replaced depends on the specific system and applicable replacement-part information. Identify the exact opener and sensor part before ordering and verify compatibility.
7. Can sunlight affect garage door sensors?
Certain sensor systems can be affected by environmental conditions such as direct sunlight. If the problem occurs only under particular conditions, document the pattern and consult the manufacturer’s troubleshooting information.
8. Can I bypass the sensors if my garage door will not close?
No. Safety sensors should not be bypassed or disabled to make the door operate. If the safety system is not functioning correctly, troubleshoot the cause using the manufacturer’s instructions or obtain professional assistance.
Conclusion
A garage door sensor not working problem does not automatically mean that the sensor needs to be replaced. Dirt, obstructions, alignment, indicator conditions, wiring, power, physical damage, and environmental factors can all be relevant to the diagnosis.
Start with the simplest checks: clear the sensor path, inspect the lenses, observe the indicator lights, and look for obvious damage. If the problem continues, use the troubleshooting information for the exact garage door opener model.
Most importantly, do not bypass the safety system. Garage door sensors are part of the equipment’s safety design, and a continuing sensor problem should be corrected rather than worked around.
When replacement equipment is actually needed, browse Garage Door Openers or Garage Door Opener Parts and verify the exact product and compatibility information before ordering.
