
Uncategorized
Chamberlain LiftMaster Garage Door Opener Troubleshooting
Oct
Chamberlain LiftMaster Garage Door Opener Troubleshooting: 9 Proven Fixes
Chamberlain LiftMaster garage door opener troubleshooting is easier when you identify the exact symptom before replacing a component. Whether the opener is completely unresponsive, the remote has stopped working, the garage door refuses to close, the door reverses unexpectedly, or the diagnostic lights indicate a problem, a systematic inspection can help narrow down the cause.
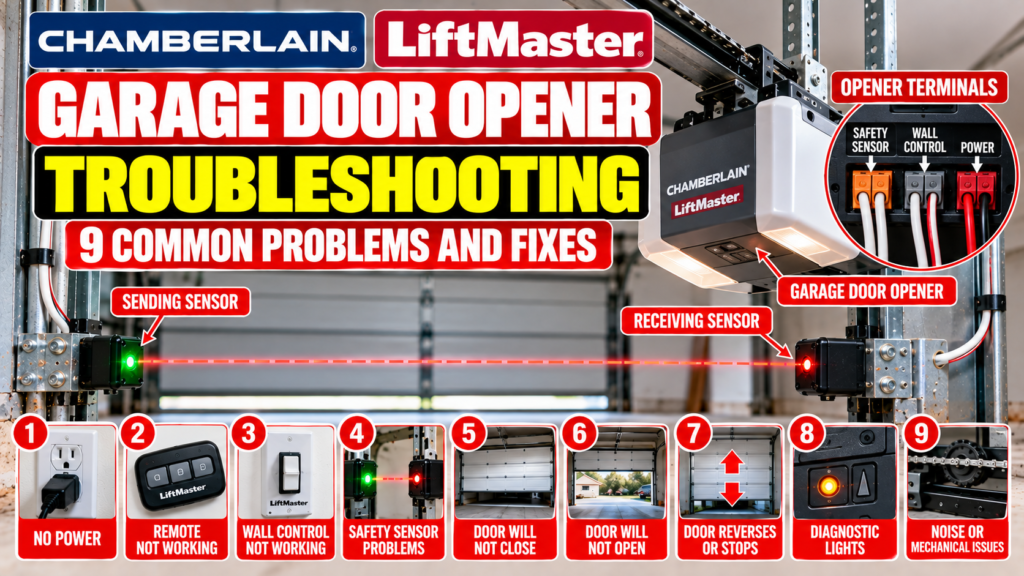
This Chamberlain LiftMaster garage door opener troubleshooting guide covers nine common problem areas, including power, remotes, wall controls, safety sensors, closing problems, opening problems, reversing, diagnostic indicators, and mechanical symptoms.
It also explains when replacement parts may be appropriate and when professional service may be the safer choice.
Important: This article provides general Chamberlain LiftMaster garage door opener troubleshooting information. Always follow the owner’s manual and manufacturer instructions for your exact opener model.
Table of Contents
- Chamberlain LiftMaster Garage Door Opener Troubleshooting Basics
- 1. Check the Power Supply
- 2. Check the Remote Control
- 3. Check the Wall Control
- 4. Check the Safety Sensors
- 5. Garage Door Will Not Close
- 6. Garage Door Will Not Open
- 7. Door Reverses or Stops
- 8. Diagnostic Lights
- 9. Mechanical Problems and Unusual Noise
- Choosing Replacement Parts
- Garage Door Openers and Opener Parts
- Maintenance
- Related Articles
- Safety
- Frequently Asked Questions
- Conclusion
Chamberlain LiftMaster Garage Door Opener Troubleshooting Basics
Effective Chamberlain LiftMaster garage door opener troubleshooting starts with observation. Instead of immediately assuming that the motor, circuit board, sensors, or another part has failed, determine what the opener actually does when you press the wall control or remote.
An opener that produces no response requires a different diagnostic approach from an opener that runs but does not move the door. Likewise, an opener that opens normally but refuses to close should lead you toward the safety-reversing system and the door’s closing path.
During Chamberlain LiftMaster garage door opener troubleshooting, record the symptoms before changing anything. Note whether the wall control works, whether the remote works, whether the opener lights activate, whether the motor makes a sound, whether the door moves, and whether it reverses.
1. Check the Power Supply
The first step in Chamberlain LiftMaster garage door opener troubleshooting is confirming that the opener is receiving power.
If there are no lights, sounds, or responses from either the wall control or remote, inspect the power supply before assuming that the motor or logic board has failed.
Check the outlet
Make sure the opener is connected to its intended power source. If it uses an accessible wall outlet, determine whether that outlet is providing power.
Check the circuit
If other equipment on the same circuit has also stopped working, the problem may not be limited to the garage door opener.
A breaker that repeatedly trips should not simply be reset over and over. Persistent electrical problems should be evaluated appropriately.
Compare the opener’s response
Observe lights and diagnostic indicators. If the opener has power but does not respond to controls, continue with the remote, wall control, sensor, and diagnostic checks below.
2. Check the Remote Control
Remote-control problems are worth checking early during Chamberlain LiftMaster garage door opener troubleshooting.
Replace the battery
A weak or depleted remote battery can prevent the remote from transmitting a usable signal. Replace the battery with the correct type specified for the remote.
Check programming
If the battery is good but the remote still does not operate the opener, verify that it is programmed correctly for the specific opener.
Programming procedures vary between models, so use the instructions intended for your exact Chamberlain or LiftMaster system.
Compare the remote with the wall control
If the wall control operates the door but the remote does not, the problem may be isolated to the remote, battery, or programming.
If neither control works, continue with the rest of this Chamberlain LiftMaster garage door opener troubleshooting process.
3. Check the Wall Control
The wall control provides another useful comparison during Chamberlain LiftMaster garage door opener troubleshooting.
If the remote works but the wall control does not, the issue may involve the wall control, its wiring, or another control-system condition.
Inspect accessible wiring
Look for obvious damage or disconnection in accessible wiring, but do not randomly move wires between terminals.
Use the wiring diagram and instructions for the exact opener model whenever wiring needs to be inspected or serviced.
Compare control behavior
Test the remote and wall control independently. This helps determine whether the problem affects one control method or the opener itself.
4. Check the Safety Sensors
Safety-reversing sensors are an important part of Chamberlain LiftMaster garage door opener troubleshooting, especially when the door opens but refuses to close.
Applicable systems use sensors positioned near the bottom of the garage door opening. The sensors work together to detect interruptions in the protected area.
Remove obstructions
Check the area between the sensors for boxes, tools, equipment, debris, or other objects that could interrupt the beam.
Check alignment
Verify that the sensors are positioned correctly according to the manufacturer’s instructions for your model.
Clean the lenses
Dust and debris can accumulate on accessible sensor lenses. Carefully clean the lenses and then observe the sensor indicators.
Inspect accessible wiring
Damaged or disconnected sensor wiring can also cause a safety-sensor condition on applicable models.
Never bypass the safety-reversing sensors. Safety systems should remain operational and should be serviced according to the opener manufacturer’s instructions.
5. Garage Door Will Not Close
A garage door that opens but refuses to close is one of the most common situations addressed by Chamberlain LiftMaster garage door opener troubleshooting.
Begin by checking the safety sensors and the door’s closing path.
Inspect the sensor area
Confirm that nothing blocks the area between the sensors. Check alignment and indicator lights according to the opener’s documentation.
Check the closing path
Make sure the door is not physically blocked by stored items, vehicles, tools, or other objects.
Do not increase force as a shortcut
If the door is difficult to close because of mechanical resistance, increasing opener force is not an appropriate substitute for finding the underlying problem.
When Chamberlain LiftMaster garage door opener troubleshooting reveals significant mechanical resistance, inspect the garage door system rather than attempting to force the opener through the problem.
6. Garage Door Will Not Open
When the door will not open, Chamberlain LiftMaster garage door opener troubleshooting should determine whether the opener responds to the command.
If nothing happens
Check power, the remote, the wall control, and available diagnostic indicators.
If the motor runs
If the opener makes a sound or appears to operate but the door does not move correctly, the problem may involve the mechanical connection between the opener and the door.
Check the door itself
A garage door that is unusually heavy or difficult to move can indicate a mechanical problem. The opener should not be expected to compensate for a damaged or binding door.
Springs, cables, rollers, tracks, hinges, and other components can affect door movement.
7. Door Reverses or Stops
Unexpected reversing or stopping requires careful Chamberlain LiftMaster garage door opener troubleshooting because several different conditions can produce similar symptoms.
| Symptom | Potential Area | First Check |
|---|---|---|
| Door reverses while closing | Safety system or obstruction | Check sensors and the door path. |
| Door stops before reaching the expected position | Travel or mechanical condition | Review the exact model instructions. |
| Motor runs but door movement is abnormal | Mechanical connection | Inspect accessible components safely. |
| Problem happens intermittently | Several possible causes | Record when the symptom occurs. |
| Door refuses to close | Safety-reversing system | Check sensors and obstructions. |
Do not repeatedly increase force or bypass safety devices simply to make the door operate. The correct Chamberlain LiftMaster garage door opener troubleshooting approach is to identify why the opener is stopping or reversing.
8. Diagnostic Lights
Some LiftMaster garage door openers provide diagnostic information through flashing LED indicators. These patterns can help narrow down a problem during Chamberlain LiftMaster garage door opener troubleshooting.
Different opener models can use different diagnostic codes. Therefore, the number of flashes or indicator behavior should always be compared with the manual for the exact model.
Depending on the model, diagnostic information may relate to safety-sensor wiring, wall-control wiring, sensor alignment, or other operating conditions.
Do not assume that a diagnostic pattern from one LiftMaster model means exactly the same thing on another model.
9. Mechanical Problems and Unusual Noise
Not every opener problem is electrical. Mechanical conditions involving the garage door can also affect opener performance.
Chamberlain LiftMaster garage door opener troubleshooting should therefore include basic observation of the door itself.
Listen for unusual sounds
Grinding, scraping, clicking, popping, or banging sounds can provide clues, although sound alone does not prove that a particular part has failed.
Inspect visible components
Look for obvious loose hardware or visible damage without placing your hands near moving mechanisms.
Consider the complete garage door system
The opener is only one part of the garage door system. Tracks, rollers, hinges, springs, cables, and other components can influence how much resistance the opener encounters.
If the door is binding or unusually heavy, the opener may be reacting to a mechanical problem rather than causing it.
Spring and cable warning: Garage door springs and cables can store substantial mechanical energy. Repairs involving these components should be handled by an appropriately qualified professional.
Choosing Replacement Parts
Once Chamberlain LiftMaster garage door opener troubleshooting identifies a component that may need replacement, verify the exact part before ordering.
A replacement component should be selected according to the opener’s exact model, applicable parts information, and manufacturer documentation.
Two components can look similar while having different electrical, mechanical, or compatibility requirements.
Never assume that a part fits simply because the brand name is the same.
LiftMaster’s official parts resource also advises checking the owner’s manual or applicable parts information when determining the correct replacement component. View LiftMaster Replacement Parts information.
Garage Door Openers and Opener Parts
Garage Door Openers
If Chamberlain LiftMaster garage door opener troubleshooting indicates that the complete opener should be replaced, browse our Garage Door Openers category.
Review the available opener options and verify that the selected system is appropriate for the specific garage door application before ordering.
Garage Door Opener Parts
If Chamberlain LiftMaster garage door opener troubleshooting identifies a repairable component, browse our Garage Door Opener Parts category.
Before ordering, verify the exact opener model and applicable part information. Product availability does not by itself establish compatibility.
Using the correct replacement component is an important part of responsible Chamberlain LiftMaster garage door opener troubleshooting. If compatibility is uncertain, verify compatibility with your exact opener model before ordering.
Maintenance
Regular observation can help identify developing problems before they become larger failures.
- Keep the garage door travel path clear.
- Keep safety sensors clean and correctly positioned.
- Watch for unusual sounds or changes in operation.
- Inspect accessible wiring for obvious damage.
- Keep the owner’s manual for the exact opener.
- Follow the manufacturer’s lubrication recommendations.
- Test safety-reversal functions according to manufacturer instructions.
- Never bypass safety devices.
- Do not use force adjustments to compensate for a damaged door.
LiftMaster’s own repair guidance identifies several common areas worth checking, including remote batteries, lubrication, safety-sensor alignment, track alignment, blocked door paths, and broken springs. See the official LiftMaster Garage Door Opener Repair & Maintenance resource for manufacturer guidance.
Related Articles
Safety
Safety should always come before convenience during garage door repairs.
- Keep children and other people away from a moving garage door.
- Keep the door’s travel path clear.
- Never bypass the safety-reversing sensors.
- Do not stand underneath a moving or partially supported door.
- Do not increase opener force simply to overcome mechanical resistance.
- Follow the manufacturer’s instructions for the exact opener model.
- Do not attempt spring or cable repairs unless properly qualified.
- Use the manufacturer’s recommended safety-test procedure.
Automatic residential garage door operators are subject to federal safety requirements in the United States. For the current federal consumer-product safety information, see the U.S. Consumer Product Safety Commission information on Automatic Residential Garage Door Operators.
When Chamberlain LiftMaster garage door opener troubleshooting involves springs, cables, major electrical faults, significant mechanical damage, or safety-system concerns, professional assistance may be appropriate.
Frequently Asked Questions
1. Why is my Chamberlain LiftMaster garage door opener not working?
Possible causes include a power problem, remote issue, wall-control problem, safety-sensor condition, mechanical resistance, travel issue, or another model-specific fault. Start by identifying exactly what happens when you activate the opener.
2. Why does my LiftMaster opener work but not close the garage door?
Check the safety sensors, their alignment, the area between the sensors, and the garage door’s closing path. A blocked or misaligned safety system can prevent normal closing on applicable models.
3. Why is my Chamberlain remote not opening the garage door?
Start by checking the remote battery. If the battery is good, verify that the remote is programmed correctly for the opener. Testing the wall control can help determine whether the problem is isolated to the remote.
4. What do flashing lights on a LiftMaster opener mean?
Some LiftMaster models use diagnostic LED flash patterns to identify potential problems. The meaning depends on the exact opener model, so use the diagnostic information in the applicable manual.
5. Why does my LiftMaster garage door reverse when closing?
A safety-sensor obstruction or alignment problem can cause reversing. Mechanical resistance, travel conditions, or another model-specific issue can also contribute. Do not bypass the safety system to make the opener operate.
6. Can I use any LiftMaster replacement part on my opener?
No. Replacement parts should be verified for the exact opener model. Check the model number, manufacturer’s parts information, and applicable documentation before ordering.
7. Should I repair or replace an older Chamberlain or LiftMaster opener?
The answer depends on the opener’s model, condition, available replacement parts, safety features, and the nature of the problem. Evaluate the exact unit rather than assuming that repair or replacement is appropriate in every situation.
8. When should I call a professional?
Professional assistance is appropriate when basic troubleshooting does not resolve the problem or when the issue involves springs, cables, major mechanical damage, electrical faults, or safety-system concerns.
Conclusion
Chamberlain LiftMaster garage door opener troubleshooting works best when you move from simple observations toward more specific diagnosis. Start with power, controls, safety sensors, the door path, diagnostic indicators, and the physical condition of the garage door before replacing components.
Do not assume that a particular component has failed simply because the opener behaves unexpectedly. Different Chamberlain and LiftMaster models can use different controls, diagnostics, accessories, and replacement components.
When a replacement component is necessary, verify the exact model and part information before ordering. Our Garage Door Opener Parts category provides a place to review available replacement components, while our Garage Door Openers category can be used when replacing the complete opener is appropriate.
For additional troubleshooting information, continue through the related articles in this cluster and return to the Garage Door Opener Troubleshooting pillar.
Above all, keep safety systems functional, follow the manufacturer’s instructions, and obtain professional assistance when the repair involves hazards that require specialized knowledge or equipment.
